The wizard function makes it possible to launch coregistration workflows in the Fusion tool in a matter of seconds. It allows rapid switching between rigid matching and elastic workflows as well as direct selection of the desired result page.
It is accessible via the dedicate green arrow button available in the top line menu in the Fusion interface, as illustrated in the capture below:
![]()
The activation of the wizard button opens a dialog window for configuration:

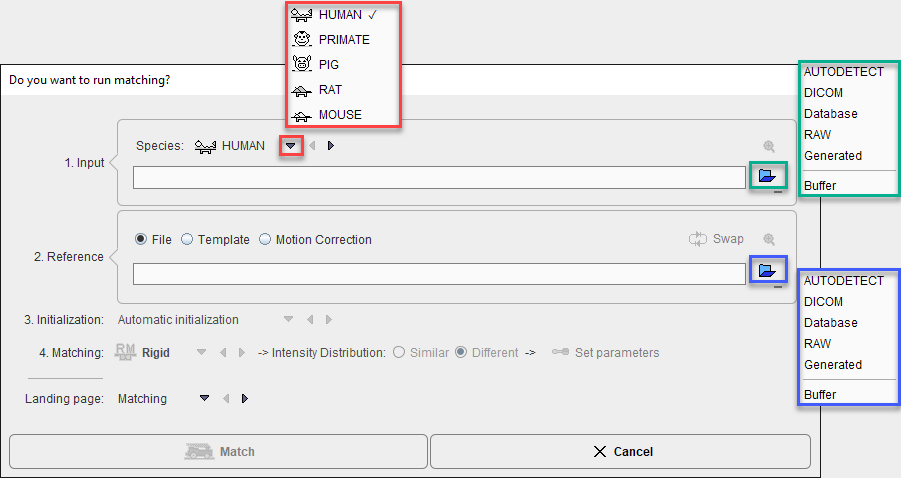
The window is organized in four main section described below.
Input Section
It is recommended to start the configuration with the selection of the Species. The correct species setting is important for proper registration defaults parameters.
Input image definition is started with the dedicated load button. It allows selecting the appropriate file format. Once the image is selected the View input image button becomes active and when initiated the image is previewed in the LOAD INPUT IMAGE sub-page while the Wizard is still accessible:

Note that only one single Input image definition is supported in the wizard interface and cropping is not supported.
Reference Section
There are three types of reference images that are supported in the wizard interface:
1.File: this option allows loading an images file after selecting the appropriate file format.
2.Template: this option allows loading a template from a predefined list of built-in template. Note that the selection of built-in templates changes according to the Species selection. In case of Human Species, the available predefined template list also depends of the Matching method.
3.Motion Correction: allows creating a reference region and bringing the anatomy into agreement across all the dynamic frames. The procedure works as described in the Motion Correction Workflow
Once the Reference image is defined the Go to Reference Step button becomes active and when initiated the image is previewed in the REFERENCE & MATCHING sub-page while the wizard is still opened:

The Swap button allows swapping the Reference and Input image
Note that cropping is not supported through the wizard interface.
Initialization
It is important for the automatic registrations that the images have a sufficient overlap. The initialization supported in the wizard interface is available for selection with the drop down arrow as illustrated below:

Automatic initialization |
Alignment of the Input and the Reference images centers. |
Origin alignment |
Alignment of the Input and the Reference coordinate origins. This works if the two series have the origin at the same anatomical landmark. |
Center of gravity alignment |
Alignment of the Input and the Reference gravity centers. This works if the two series have about the same value distribution. |
Center of images |
Alignment of the Input and the Reference image volume center |
Matching
The matching selection reduces complexity and improves the speed for standard matching situations.

The Intensity distribution and the Set parameters settings correspond to the selected Matching method. The details settings for each Matching method is described in the Matching Workflow section above.
Landing Page
The Landing page selection allows choosing on which page the matching result will be shown:

Start the Matching
Finally, activate the Match button to start the matching procedure. The wizard window is closed, the matching procedure is started and the results are returned on the selected Landing page.
Wizard Easy Switch
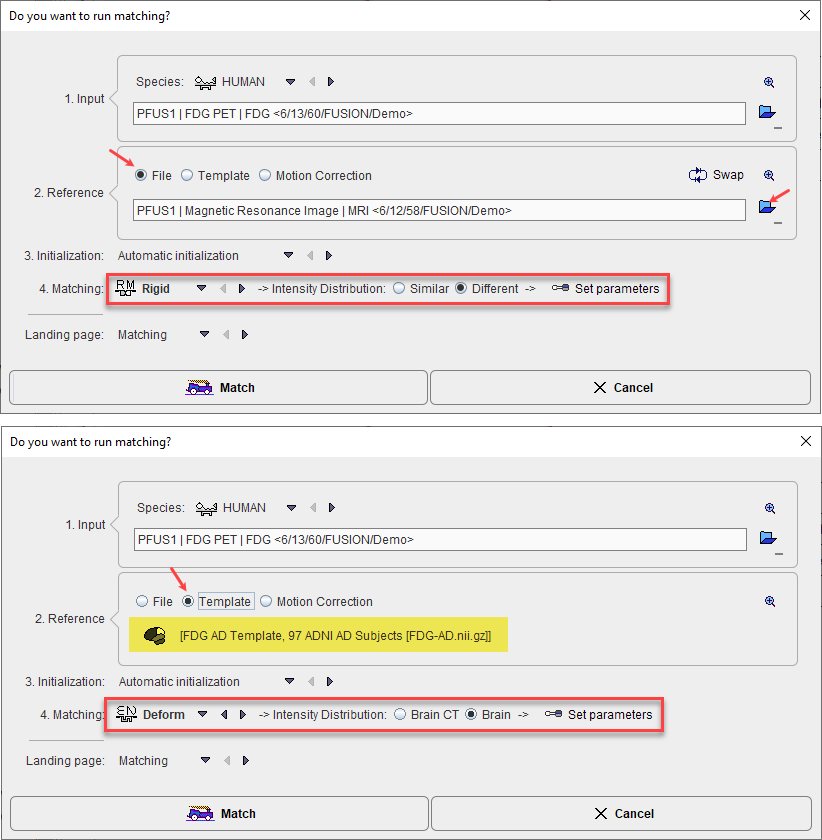
In the example below it is illustrated how a Rigid Matching configuration for a Human brain can be easily switched by simply enabling the Template radio button for the Reference and selecting one of the images from the predefined list available in combination with the Deformable Matching configuration:
